Novice Series -- P6 Instructions of Mounting Task to OS in Data Explorer
|
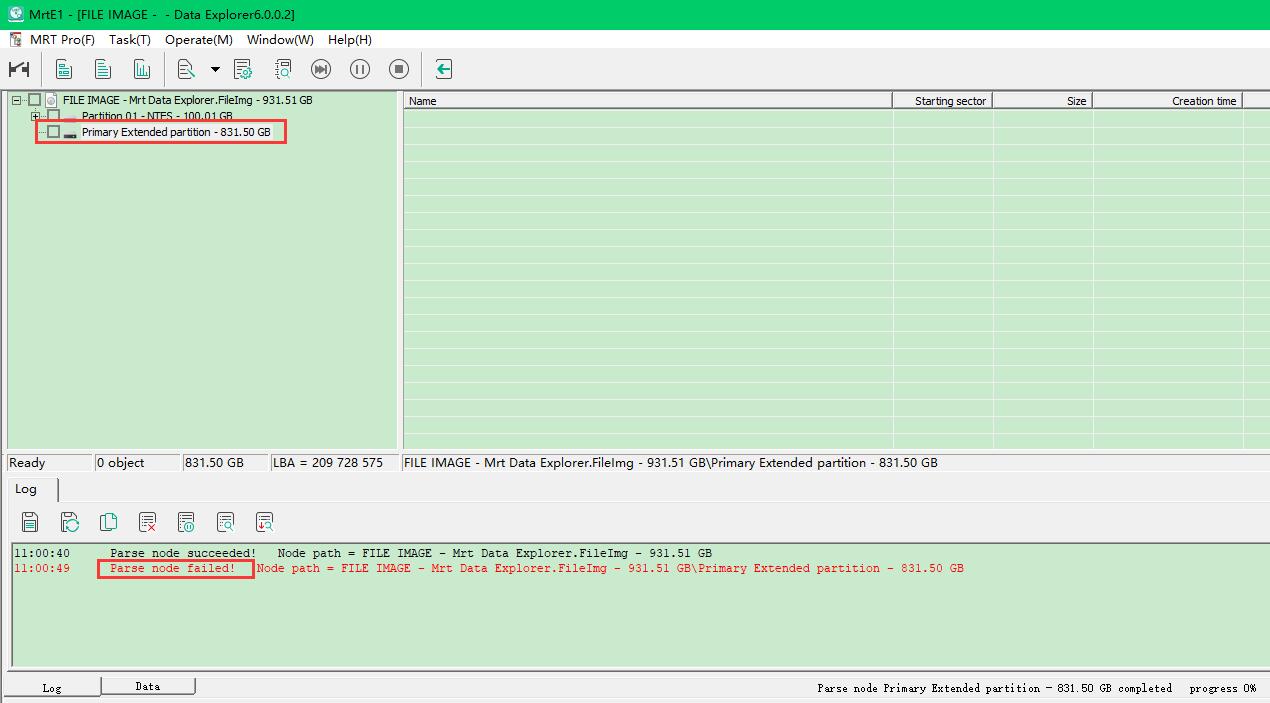
Last time we introduce a method about mounting a disk to OS so that we can use third-party tools to recover user files.Please refer to this link: http://us.mrtlab.com/tech/otherdisk/205.html In this article we are going to introduce another method about mounting a task created in Data Explorer,by which we can use third-party tools as well to recover user files. -- What is the difference between them? -- Actually the application scene depends on what target device we choose to store patient user data. That is,mounting a disk to OS is to mount target drive to OS and mounting a task to OS is generally to mount fileimage task to OS. -- When do we choose a seperate drive as target device and fileimage as target device? -- The answer is very easy: If we dont have an available drive at hand to store patient user data, then we can choose fileimage provided by MRT Data Explorer. Now let's see how to mount a task to OS: 1. We may meet a situation that the important partitions are invisible in MRT File Explorer mode.This could be caused by bad sectors or unsupported file system format,shown as below:
To solve this problem,firstly,we need create a data copy task(enabled option of data copy when creating a task) and choose fileimage when we dont have an available hard drive as target device. 2.After patient data imaged into fileimage,we need to create a new task and choose the task file of fileimage as source device so that we can view sector data of imaged patient data,shown as below:
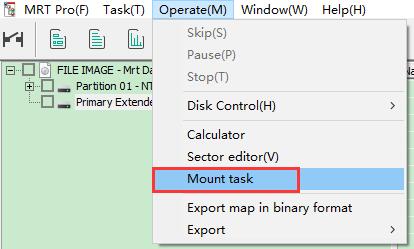
3. The function of "Mount Task" in Data Explorer is to mount current task to host system as a physical disk, which can work with any disk operating software. Attention: This time we don't need to enable data copy option and choose target device. Now we just click the function here as shown in picture:
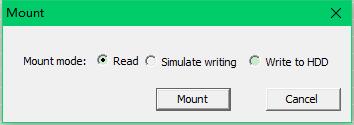
There are 3 modes: 1) The mounting mode is “Read only” by default, which can make sure nothing is written to the HDD to preserve source user data. 2) If a user choose “Write actually into”, data will be written into HDD when the user executes the operation of writing something into the HDD. Error may occur if some of the third-party software can not write, and the later operations can not be executed. So in order to avoid this problem, users can choose “Write Simulately into”. Then the third-party software will give a feedback of successfully writing. However, the data is actually not written into the HDD, the effect of which is the same with “Read only”. 4. After mounting task to OS,we are able to use software such as Rstudio to scan for files from the device.Once you have recovered what client requires,you should go back to Data Explorer and cancel the function of "Mount Task".
Thanks for your concern and support! As to any question, you can consult technical contact info: live:mrtpro_1 |